Checking in items
In the Check in window, you scan the item. Click Check in or press Enter once to check in the items in the list.
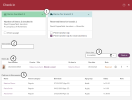
| 1 | Success feedback |
Feedback on successful transactions is shown here. This feedback remains after a new action in the window (new transactions are added to the existing feedback). The information can be expanded or collapsed using the arrow. Receipts can be printed or sent as email. A default setting for receipts can be made per workplace, but you can always select or deselect printing or emailing here. The printing and/or sending of email starts when you close the Check in window. |
| 2 | Search field | This is where you search for an item by scanning or typing the item number. |
| 3 | Return date |
You can set a specific return date for all items if you want to. This can be useful for example if you use a check-in bin and have not emptied it for some time. |
| 4 | Scanned items |
All the items in the list will be checked in. Any alerts for the item are also displayed. Clicking the expand icon displays the item details. Use the context menu to change return date for a single item. Clicking the x removes an item from the list. You can navigate to the patron details and to the works by clicking the patron or title directly in the list. |
| 5 | Patron |
All unique patrons covered by the current check-in session will be listed separately. This gives you the opportunity to navigate to the patron information also after completing the check-in. |
If the current branch has routes/stops it is possible to select the current route/stop when checking in items. A selected route/stop will be kept during the session or until changes. For all check-outs/renewals/check-ins, the information about route/stop will be included in the analytics information, and it will also be possible to filter Patron/Loans based on route/stop.
When a temporary item is checked in, you need to register it properly. See also: Temporary items
| Note: |
|---|
| Outgoing ILL reservations are “checked out” via the Check in window. The Send to library function is activated when scanning an outgoing ILL in the Check in window. This applies to all loans to patrons that belong to a patron category marked as ILL out libraries. In these cases, there is no reason to search a for patron using for example a library card to make a regular checkout. |


